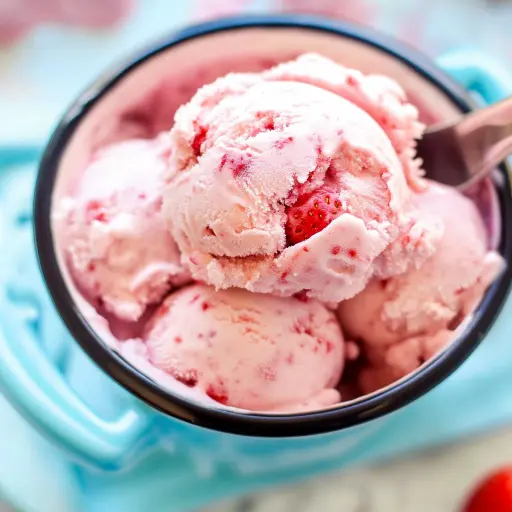
Description: Indulge in the sweet taste of summer with this incredibly easy and delicious homemade strawberry ice cream. Made with fresh strawberries, creamy goodness, and a hint of vanilla, this recipe requires no special skills and produces a smooth, flavorful ice cream that’s far superior to anything you can buy at the store. Get ready for a burst of fruity delight that will have everyone asking for seconds!
Ingredients:
- 1 1/2 cups fresh strawberries, hulled and diced
- 2 tablespoons honey (preferably local)
- 1/2 cup granulated sugar (adjust to taste)
- 1 teaspoon fresh lemon juice
- 1 cup heavy whipping cream (at least 36% milk fat)
- 1/2 cup half and half
- 1 teaspoon pure vanilla extract
Preparation:
Step 1: Prepare the Strawberries: Begin by washing and thoroughly drying the fresh strawberries. Hull them (remove the green leafy tops) and dice them into small, uniform pieces. The size of the dice will affect the texture of your final ice cream. Smaller pieces will result in a smoother ice cream, while slightly larger pieces will provide bursts of strawberry flavor.
Step 2: Macerate the Strawberries: In a large bowl, combine the diced strawberries, honey, granulated sugar, and lemon juice. Gently stir the ingredients together until they are well combined. The purpose of this step is to macerate the strawberries, which means to allow them to sit and release their natural juices. This process helps to draw out the strawberry flavor and soften the fruit, creating a more intense and delicious ice cream base. Cover the bowl and let it sit at room temperature for 15-20 minutes, or even longer if you have the time. You’ll notice the strawberries begin to soften and release a beautiful, vibrant red juice.
Step 3: Mash or Puree (Your Choice!): After the strawberries have macerated, it’s time to decide on your desired ice cream texture. For a more rustic ice cream with noticeable strawberry pieces, use a potato masher, fork, or pastry cutter to gently mash the mixture. You want to break down the strawberries and release more of their juices, but avoid completely pureeing them. For a smoother, creamier ice cream, you can use a blender or food processor to puree the strawberry mixture until completely smooth. Be mindful of the note above about adjusting the amount of strawberries if pureeing. Too much liquid can make the ice cream less creamy.
Step 4: Combine the Dairy: In the bowl with the mashed or pureed strawberries, add the heavy whipping cream, half and half, and vanilla extract. Gently stir the mixture until everything is just combined. Overmixing can result in a less creamy ice cream. Make sure all the ingredients are evenly distributed, but avoid vigorously whisking or beating the mixture.
Step 5: Churn and Freeze: Pour the strawberry cream mixture into your ice cream maker. Follow the manufacturer’s instructions for your specific ice cream maker model. Generally, this involves churning the mixture for about 15-25 minutes, or until it reaches a soft-serve consistency. Once churned, you have two options: enjoy the ice cream immediately as a soft-serve treat, or transfer it to an airtight container and freeze for 3-4 hours to harden it further.
Step 6: (Optional) Harden the Ice Cream: To freeze the ice cream, transfer it to an airtight container. A shallow container is ideal for quicker freezing. Place the container in the freezer for at least 3-4 hours, or preferably overnight, to allow the ice cream to firm up to a scoopable consistency.
Step 7: Serve and Enjoy: Before serving, allow the ice cream to sit at room temperature for about 5-10 minutes to soften slightly. This will make it easier to scoop and enhance its creamy texture. Scoop the ice cream into bowls or cones, and add your favorite toppings, such as fresh strawberries, whipped cream, chocolate sauce, or sprinkles. Savor the delicious, homemade goodness!
Why You Will Love This Recipe:
This Luscious Homemade Strawberry Ice Cream recipe is a winner for several reasons:
- Fresh and Flavorful: Using fresh strawberries ensures a burst of authentic strawberry flavor that you simply can’t achieve with artificial ingredients.
- Customizable: You have complete control over the sweetness and texture. Adjust the amount of sugar to your preference, and choose between a chunky or smooth ice cream.
- Easy to Make: The recipe is straightforward and requires minimal effort. It’s perfect for beginner ice cream makers.
- No Artificial Ingredients: Say goodbye to artificial flavors, colors, and preservatives. This ice cream is made with wholesome ingredients you can trust.
- Impressive: Homemade ice cream always makes a great impression on guests. It’s a thoughtful and delicious treat that shows you care.
- Perfect for Summer: This recipe is the quintessential summer dessert, perfect for cooling down on a hot day.
- Adaptable: You can easily adapt this recipe to use other berries, such as raspberries, blueberries, or blackberries.
Serving Suggestions:
- Serve in a bowl or cone with fresh strawberries, whipped cream, and a drizzle of chocolate sauce.
- Use it to make ice cream sandwiches with your favorite cookies.
- Top waffles or pancakes with a scoop of strawberry ice cream for a decadent breakfast or brunch.
- Create a strawberry ice cream float with sparkling water or lemonade.
- Serve it as a complement to a warm slice of strawberry pie or crumble.
- Add a scoop to a milkshake for an extra burst of strawberry flavor.
Tips:
- Use the Best Strawberries: The quality of your strawberries will directly impact the flavor of your ice cream. Choose ripe, fragrant berries for the best results.
- Chill Everything: Chilling the ice cream maker bowl, the strawberry mixture, and any other utensils you’ll be using will help the ice cream freeze faster and prevent ice crystals from forming.
- Don’t Overfill the Ice Cream Maker: Overfilling the ice cream maker can prevent the ice cream from churning properly and may even damage the machine.
- Taste and Adjust: Taste the strawberry mixture before churning and adjust the sweetness or lemon juice to your liking.
- Storage: Store the ice cream in an airtight container in the freezer for up to two weeks. To prevent ice crystals from forming, press a piece of plastic wrap directly onto the surface of the ice cream before sealing the container.
- Softening Before Serving: Remember to let the ice cream sit at room temperature for a few minutes before scooping to soften it.
- Experiment with Flavors: Try adding other flavors to the strawberry ice cream, such as chopped mint, a splash of balsamic vinegar, or a pinch of sea salt.
Prep Time: 20 minutes
Cook Time: 15-25 minutes (churning) + 3-4 hours (freezing)
Total Time: 4 hours (minimum)
Nutritional Information (approximate per serving): (This will vary based on specific ingredients and portion size)
- Calories: 250-300
- Protein: 2-3g
- Sodium: 20-30mg
Conclusion:
This Luscious Homemade Strawberry Ice Cream recipe is a guaranteed crowd-pleaser. Its fresh, vibrant flavor, creamy texture, and easy preparation make it the perfect summer treat. So gather your ingredients, dust off your ice cream maker, and get ready to indulge in a taste of homemade happiness! The effort is minimal, and the reward is a delectable dessert that will leave you wanting more. Enjoy!
Questions and Answers About This Recipe:
- Can I use frozen strawberries instead of fresh?
- While fresh strawberries are preferred for the best flavor and texture, you can use frozen strawberries in a pinch. Be sure to thaw them completely and drain off any excess liquid before using them. This will help prevent the ice cream from becoming too watery. You might also want to consider slightly reducing the amount of half and half to compensate for the extra moisture.
- I don’t have an ice cream maker. Can I still make this recipe?
- Yes, although it won’t be quite the same. You can try the “no-churn” method. After preparing the strawberry mixture, pour it into a freezer-safe container. Every 30 minutes for the first 2-3 hours, take the container out and stir or whisk the mixture vigorously to break up any ice crystals that are forming. This will help to create a smoother texture. It will take longer to freeze and the texture might be slightly icier than churned ice cream, but it’s a decent alternative.
- Can I use a different type of sweetener besides sugar?
- Yes, you can experiment with different sweeteners. Agave nectar, maple syrup, or even a sugar substitute can be used, but keep in mind that they may affect the taste and texture of the ice cream. You may need to adjust the amount of sweetener to achieve your desired level of sweetness. Honey is already included in the recipe but replacing all sugar with honey would change the flavor profile considerably.
- How can I prevent ice crystals from forming in my homemade ice cream?
- Several factors can contribute to ice crystal formation. Make sure to chill all of your ingredients and equipment before starting. Also, avoid overfilling the ice cream maker. When storing the ice cream, use an airtight container and press a piece of plastic wrap directly onto the surface of the ice cream to minimize air exposure. Adding a tablespoon or two of vodka or another high-proof alcohol to the mixture can also help prevent ice crystal formation, as alcohol doesn’t freeze.
- My ice cream is too hard to scoop after freezing. What can I do?
- This is a common issue with homemade ice cream. The key is to let it sit at room temperature for about 5-10 minutes before scooping. This will allow it to soften slightly and become easier to handle. If it’s still too hard, try running your ice cream scoop under warm water before each scoop. Alternatively, you can try transferring the ice cream to the refrigerator for about 30 minutes before serving to allow it to soften more gradually.


