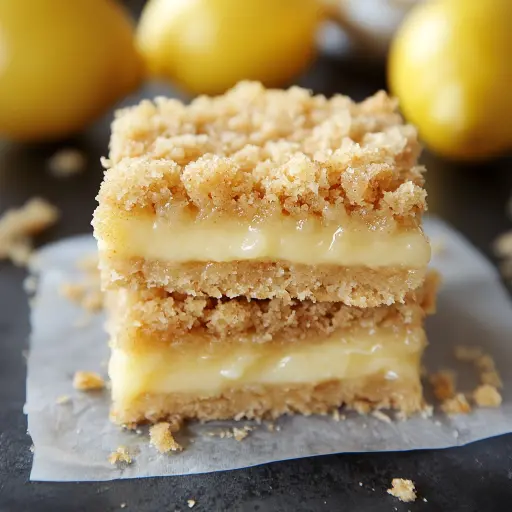
Description: These Lemon Crumb Bars are a delightful combination of a buttery, oaty crust and a tangy, sweet lemon filling, topped with a golden, crumbly topping. They are easy to make, perfect for any occasion, and guaranteed to be a crowd-pleaser. Imagine the bright zest of fresh lemons mingling with the richness of a crumbly, buttery base – a truly irresistible treat!
Ingredients:
- 1 ¼ cups all-purpose flour
- 1 ¼ cups old-fashioned rolled oats
- ½ teaspoon salt
- ½ teaspoon baking soda
- ½ cup granulated sugar
- ½ cup packed light brown sugar
- ¾ cup (1 ½ sticks) unsalted butter, melted
- 1 teaspoon vanilla extract
- 1 (14 oz) can sweetened condensed milk
- 2 tablespoons finely grated lemon zest (from about 2 large lemons)
- ½ cup fresh lemon juice (from about 2-3 large lemons)
- 2 large egg yolks
Preparation:
Step 1: Prepare the Baking Pan: Preheat your oven to 350°F (175°C). Thoroughly grease an 8×8-inch baking pan with baking spray or line it with parchment paper, leaving an overhang on two sides for easy removal. Parchment paper makes lifting the bars out and cutting them much easier. Grease or spray the parchment paper if using. Ensure the pan is well-prepared to prevent sticking, which can ruin the look of your bars. A clean presentation is key to making them visually appealing.
Step 2: Combine Dry Ingredients for the Crumble: In a large mixing bowl, whisk together the all-purpose flour, old-fashioned rolled oats, salt, and baking soda. The oats add a lovely texture and slightly nutty flavor to the crumb topping and base. The salt enhances the sweetness, and the baking soda provides a little lift, ensuring the crumble isn’t too dense. Whisking ensures even distribution, so you don’t get pockets of baking soda or salt in your bars.
Step 3: Add Sugars to Dry Ingredients: Stir in the granulated sugar and packed light brown sugar. Brown sugar adds moisture and a deeper, caramel-like flavor that complements the lemon beautifully. Using a combination of both sugars creates a more complex and delightful sweetness. Make sure to pack the brown sugar firmly when measuring to ensure accurate sweetness and moisture levels.
Step 4: Incorporate Melted Butter and Vanilla: Mix the melted butter and vanilla extract together. Then, add the melted butter mixture to the dry ingredients. Stir until well combined, creating a crumbly mixture. The melted butter binds all the dry ingredients, forming the base and topping. Be careful not to overmix; you want a crumbly texture, not a dough. Overmixing can develop the gluten in the flour, resulting in a tougher base.
Step 5: Press Half of the Crumble into the Pan: Press half of the crumble mixture firmly and evenly into the bottom of the prepared pan. This forms the base of your lemon bars. Use the bottom of a measuring cup or your fingers to press the mixture tightly. A well-compacted base will prevent the lemon filling from seeping through and creating a soggy bottom.
Step 6: Bake the Crust: Bake the crust in the preheated oven for 15 minutes. This par-baking process ensures the crust is sturdy enough to support the lemon filling and prevents it from becoming soggy. Keep an eye on the crust; you want it lightly golden, not browned.
Step 7: Prepare the Lemon Filling: While the crust is baking, prepare the lemon filling. In a separate bowl, whisk together the sweetened condensed milk, finely grated lemon zest, fresh lemon juice, and egg yolks. The sweetened condensed milk provides sweetness and creaminess, while the lemon zest and juice offer a vibrant, tangy flavor. The egg yolks add richness and help to set the filling. Whisk until the mixture is smooth and well combined. This prevents any lumps and ensures a consistent texture.
Step 8: Assemble and Bake: Once the crust is done, pour the lemon filling evenly over it. Sprinkle the remaining crumble mixture evenly over the top of the filling. This creates a beautiful golden and textured topping.
Step 9: Final Bake: Bake for an additional 20–22 minutes, or until the topping is lightly golden and the filling is set but still slightly jiggly. The filling will continue to set as it cools. Avoid overbaking, as this can result in a dry or cracked filling.
Step 10: Cool and Refrigerate: Allow the bars to cool completely at room temperature, then refrigerate for at least 2-3 hours, or preferably overnight, until firm. This allows the filling to set properly and makes the bars easier to cut. Chilling also enhances the flavors.
Step 11: Slice and Serve: For cleaner slices, chill the bars thoroughly or freeze briefly before cutting to prevent the filling from oozing. Use a sharp knife and wipe it clean between each slice.
Step 12: Optional White Chocolate Dip: For an extra treat, dip the bottom half of the frozen bars in melted white chocolate. Place them on a wax paper-lined baking sheet and refrigerate until set. This adds a layer of sweetness and elegance to the bars.
Why You Will Love This Recipe:
This recipe is a winner for so many reasons! The combination of the buttery, crumbly base and topping with the bright, tangy lemon filling is simply irresistible. The bars are relatively easy to make, requiring minimal effort and readily available ingredients. They are perfect for potlucks, bake sales, desserts after dinner, or simply a sweet treat to enjoy with a cup of tea or coffee. The textures and flavors combine to create a delightful sensory experience. The crust is buttery and slightly chewy while the lemon filling is smooth and citrusy. The bars look as good as they taste, making them ideal for special occasions. Plus, they keep well in the refrigerator, so you can make them ahead of time.
Serving Suggestions:
- Serve the Lemon Crumb Bars chilled for a refreshing treat.
- Dust the top with powdered sugar for an elegant presentation.
- Pair them with a scoop of vanilla ice cream or a dollop of whipped cream.
- Serve alongside fresh berries like raspberries or strawberries for a complementary flavor profile.
- Cut into small squares for bite-sized treats at parties.
- Enjoy with a hot cup of tea or coffee for a delightful afternoon snack.
Tips:
- Use fresh lemon juice for the best flavor. Bottled lemon juice can lack the brightness and zest of fresh lemons.
- Zest the lemons before juicing them. It’s much easier to zest a whole lemon than a squeezed one!
- Don’t overbake the crust or the filling. Overbaking can result in a dry or cracked filling and a hard crust.
- Chill the bars thoroughly before cutting. This will help them hold their shape and prevent the filling from oozing.
- For cleaner slices, use a warm, sharp knife and wipe it clean between each cut.
- Store the bars in an airtight container in the refrigerator for up to 5 days.
- Freeze the bars for longer storage. Wrap them tightly in plastic wrap and then place them in a freezer bag. They can be frozen for up to 2 months.
Prep Time: 20 minutes
Cook Time: 35-37 minutes
Total Time: 3 hours (includes cooling and chilling time)
Nutritional Information (per serving, approximate):
- Calories: 350 kcal
- Protein: 4g
- Sodium: 150mg
Conclusion:
Lemon Crumb Bars are a timeless classic that never fails to impress. The perfect balance of sweet and tangy flavors, combined with the delightful crumbly texture, makes them a truly irresistible dessert. Whether you’re a seasoned baker or just starting out, this recipe is easy to follow and guaranteed to produce delicious results. So, gather your ingredients, preheat your oven, and get ready to enjoy the bright and sunny flavors of these amazing Lemon Crumb Bars! These bars are not just a dessert; they’re a little burst of sunshine in every bite!
Questions and Answers about Lemon Crumb Bars:
Q1: Can I use a different type of flour for the crumble?
A: Yes, you can substitute whole wheat flour for some of the all-purpose flour for a slightly nuttier flavor and added fiber. However, using entirely whole wheat flour may result in a denser, less tender crumble. A 50/50 blend of all-purpose and whole wheat flour works well. You could also try using gluten-free all-purpose flour blend for a gluten-free version, but the texture may vary slightly.
Q2: Can I use bottled lemon juice instead of fresh?
A: While fresh lemon juice is highly recommended for the best flavor, you can use bottled lemon juice in a pinch. However, be aware that bottled lemon juice may not have the same bright, zesty flavor as fresh lemon juice. If using bottled juice, consider adding a touch more lemon zest to compensate for the difference in flavor intensity.
Q3: My lemon filling is too runny. What did I do wrong?
A: A runny lemon filling can be caused by a few factors. First, make sure you’ve measured the lemon juice accurately. Too much lemon juice can prevent the filling from setting properly. Second, ensure the filling is cooked until it’s just set but still slightly jiggly. Overbaking can lead to a cracked filling, but underbaking will result in a runny one. Finally, ensure the bars are thoroughly chilled before cutting. Chilling helps the filling to firm up and set completely.
Q4: Can I freeze Lemon Crumb Bars?
A: Yes, Lemon Crumb Bars freeze very well! To freeze, allow the bars to cool completely, then cut them into individual squares. Wrap each square tightly in plastic wrap and then place them in a freezer bag or airtight container. They can be frozen for up to 2 months. When ready to serve, thaw them in the refrigerator overnight or at room temperature for a few hours.
Q5: Can I make these bars ahead of time?
A: Absolutely! In fact, making them ahead of time is recommended. The Lemon Crumb Bars actually taste better after they’ve been chilled in the refrigerator for a few hours or overnight. This allows the flavors to meld together and the filling to set properly. You can bake the bars up to 2-3 days in advance and store them in an airtight container in the refrigerator.