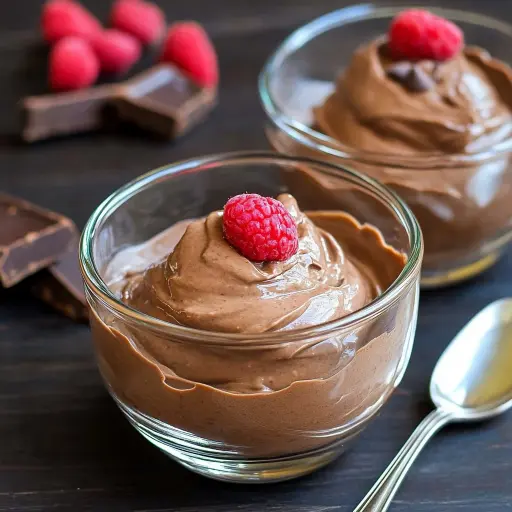
Description: This deceptively healthy chocolate pudding is a guilt-free indulgence that delivers all the rich, decadent flavor of traditional pudding without the processed ingredients and excessive sugar. Made with simple, wholesome ingredients, it’s naturally creamy, intensely chocolatey, and customizable to suit your dietary needs. Whether you’re vegan, gluten-free, or simply looking for a healthier dessert option, this pudding is sure to satisfy your sweet cravings.
Ingredients:
- 2 cups milk of choice (dairy, almond, oat, soy, cashew, etc.) OR canned full-fat coconut milk (for extra richness)
- Heaping 1/8 tsp salt (enhances the chocolate flavor)
- 1/4 cup Dutch-processed cocoa powder (for a deeper, less acidic chocolate taste)
- 1/3 cup sweetener of choice (granulated sugar, pure maple syrup, erythritol, honey, agave nectar, or a blend of sweeteners) – adjust to your taste preference
- 1/2 cup milk of choice (same as above) + 3 tbsp cornstarch (for thickening)
- Optional: 3 oz dark or semi-sweet chocolate chips or broken-up chocolate bar (adds extra richness and depth of flavor)
- 3/4 tsp pure vanilla extract (enhances the overall flavor profile)
Preparation:
The beauty of this pudding lies in its simplicity. Here’s how to create this delectable treat:
Step 1: Combining the Base Ingredients
In a medium-sized saucepan, pour in the 2 cups of your chosen milk. Add the heaping 1/8 teaspoon of salt, the 1/4 cup of Dutch-processed cocoa powder, and the 1/3 cup of your preferred sweetener. Whisk these ingredients together vigorously until the cocoa powder is fully dissolved and no lumps remain. This ensures a smooth, consistent texture in the final pudding.
Step 2: Preparing the Cornstarch Slurry
In a separate small bowl, combine the 1/2 cup of milk with the 3 tablespoons of cornstarch. Whisk these ingredients together until the cornstarch is completely dissolved, forming a smooth slurry. It’s crucial to ensure there are no clumps of cornstarch, as these can lead to a grainy texture in the finished pudding. The cornstarch is the key to thickening the pudding to the perfect consistency.
Step 3: Heating and Thickening the Pudding
Place the saucepan with the milk, cocoa powder, salt, and sweetener mixture over medium heat. Stir continuously with a whisk to prevent the milk from scorching or sticking to the bottom of the pan. Once the mixture is warm (not boiling), slowly pour in the cornstarch slurry while continuing to whisk constantly. The continuous whisking is vital at this stage to prevent the cornstarch from clumping and to ensure even thickening.
Step 4: Boiling and Simmering
Bring the mixture to a gentle boil, still whisking constantly. Once it begins to boil, continue stirring vigorously for 2 minutes. You’ll notice the pudding thickening rapidly during this time. After 2 minutes of boiling and stirring, reduce the heat to a low simmer and continue stirring for an additional minute. This final simmering ensures that the cornstarch is fully cooked and the pudding reaches the desired consistency.
Step 5: Finishing Touches and Cooling
Remove the saucepan from the heat. Immediately stir in the 3/4 teaspoon of pure vanilla extract and the optional 3 ounces of dark or semi-sweet chocolate chips or broken-up chocolate bar, if using. Stir until the chocolate is completely melted and incorporated into the pudding, creating a luscious, smooth, and intensely chocolatey mixture.
Step 6: Chilling and Thickening (Patience is Key!)
Transfer the pudding to a container with a lid or individual serving dishes. Cover the container or dishes tightly to prevent a skin from forming on the surface of the pudding. Place the pudding in the refrigerator to chill for at least a few hours, or preferably overnight. The pudding will continue to thicken as it cools, reaching its optimal creamy and decadent consistency. The longer it chills, the richer and more flavorful it becomes.
Why You Will Love This Recipe:
This healthy chocolate pudding is a winner for so many reasons:
- Guilt-Free Indulgence: It satisfies your chocolate cravings without the refined sugars and processed ingredients often found in traditional pudding.
- Customizable: Easily adapt the recipe to your dietary needs and preferences by using different types of milk and sweeteners.
- Rich and Creamy Texture: The combination of cornstarch and your choice of milk (especially coconut milk) creates a luxurious, velvety texture.
- Intense Chocolate Flavor: The Dutch-processed cocoa powder and optional chocolate chips provide a deep, satisfying chocolate experience.
- Simple and Easy to Make: The recipe requires minimal ingredients and is quick to prepare, making it perfect for busy weeknights or last-minute desserts.
- Versatile: Enjoy it on its own, use it as a filling for pies or tarts, or top it with fresh fruit, whipped cream, or nuts for a more elaborate dessert.
- Naturally Vegan and Gluten-Free: With the right milk and sweetener choices, this pudding is naturally vegan and gluten-free, making it suitable for a wide range of dietary restrictions.
Cooking Rating:
- Ease of Preparation: Easy
- Taste: Excellent
- Healthiness: Very Good
Serving Suggestions:
- Classic Pudding: Serve chilled in individual bowls or glasses.
- Layered Dessert: Layer with crumbled cookies, fresh berries, and whipped cream for a delightful parfait.
- Pie Filling: Use as a filling for chocolate cream pie or tart.
- Chocolate Mousse: For a lighter, airier texture, fold in whipped coconut cream or regular whipped cream after chilling.
- Toppings: Garnish with chocolate shavings, cocoa nibs, chopped nuts, or a dollop of whipped cream.
- Pairings: Enjoy with a cup of coffee, tea, or a glass of cold milk.
Tips:
- Dutch-Processed Cocoa Powder: Using Dutch-processed cocoa powder results in a smoother, richer flavor and darker color. If you only have regular unsweetened cocoa powder, you may need to adjust the sweetener to compensate for the more acidic taste.
- Sweetener Adjustment: Taste the pudding mixture before chilling and adjust the sweetener to your preference. Keep in mind that the flavor will intensify as it chills.
- Preventing Skin Formation: To prevent a skin from forming on the surface of the pudding while chilling, press a piece of plastic wrap directly onto the surface before covering the container or dishes.
- Milk Choice: Coconut milk will yield the richest, creamiest pudding. Almond milk, oat milk, or other plant-based milks will work as well, but the texture may be slightly less decadent. Using dairy milk will also work.
- Chocolate Variation: Experiment with different types of chocolate, such as milk chocolate, white chocolate, or even flavored chocolate bars like sea salt caramel or mint chocolate.
- Cornstarch Alternative: While cornstarch is the most common thickener for pudding, you can try using arrowroot powder as a substitute. However, arrowroot may produce a slightly different texture and may not hold up as well over time.
- Spice It Up: Add a pinch of cinnamon, nutmeg, or cayenne pepper for a warm, spicy twist.
- Espresso Kick: Add a teaspoon of instant espresso powder to enhance the chocolate flavor.
Prep Time: 5 minutes
Cook Time: 5 minutes
Total Time: 10 minutes (plus chilling time)
Nutritional Information:
(Note: Nutritional information is approximate and will vary depending on the specific ingredients used, such as the type of milk and sweetener.)
- Calories: Approximately 150-250 per serving (depending on ingredients)
- Protein: 3-5g per serving
- Sodium: 50-100mg per serving
Conclusion:
This Healthy Chocolate Pudding recipe is a delightful and guilt-free way to satisfy your sweet tooth. With its rich, creamy texture, intense chocolate flavor, and simple preparation, it’s a dessert that you can feel good about enjoying. Whether you’re following a special diet or simply looking for a healthier alternative to traditional pudding, this recipe is sure to become a new favorite. Enjoy!
Questions and Answers About This Recipe:
Q1: Can I use a different type of sweetener besides sugar or maple syrup?
A: Absolutely! This recipe is very flexible when it comes to sweeteners. You can use honey, agave nectar, erythritol, stevia, or any other sweetener you prefer. Keep in mind that the sweetness level may vary depending on the sweetener you choose, so you may need to adjust the amount accordingly. Start with the recommended amount and taste the pudding mixture before chilling to ensure it’s sweet enough for your liking. If using a sugar substitute like stevia or erythritol, it may be best to use a blend to help offset any aftertaste.
Q2: I don’t have Dutch-processed cocoa powder. Can I use regular unsweetened cocoa powder instead?
A: Yes, you can substitute regular unsweetened cocoa powder for Dutch-processed cocoa powder. However, keep in mind that regular cocoa powder is more acidic than Dutch-processed cocoa powder, which can affect the flavor of the pudding. To compensate for the acidity, you may need to add a pinch of baking soda (about 1/8 teaspoon) to the mixture along with the cocoa powder. This will help to neutralize the acidity and prevent a bitter taste. Also, you might want to use a little more sweetener to compensate for the slightly less intense chocolate flavor.
Q3: Can I make this pudding ahead of time?
A: Absolutely! In fact, this pudding is best made ahead of time. Chilling it for at least a few hours, or preferably overnight, allows the flavors to meld together and the pudding to thicken to the perfect consistency. You can store the pudding in the refrigerator for up to 3-4 days. Just make sure to cover it tightly to prevent it from drying out or absorbing any unwanted flavors from the fridge.
Q4: Can I freeze this pudding?
A: While you can freeze this pudding, the texture may change slightly after thawing. The cornstarch can sometimes cause the pudding to become a bit grainy or watery after freezing. If you do choose to freeze it, make sure to store it in an airtight container to prevent freezer burn. When thawing, thaw it slowly in the refrigerator and whisk it vigorously to restore the creamy texture. However, for the best texture, it’s recommended to enjoy the pudding fresh or within a few days of making it.
Q5: My pudding is too thin. What did I do wrong?
A: If your pudding is too thin, there are a few potential reasons why. First, make sure you used the correct amount of cornstarch. Cornstarch is essential for thickening the pudding, so if you didn’t use enough, it won’t reach the desired consistency. Second, make sure you brought the pudding to a full boil and continued stirring for the recommended 2 minutes. This is crucial for activating the cornstarch and allowing it to thicken the pudding. If you still find that your pudding is too thin after boiling, you can try whisking in a small amount of additional cornstarch (1 teaspoon mixed with 1 tablespoon of cold milk) and simmering for another minute or two until it thickens. However, be careful not to add too much cornstarch, as this can result in a gummy texture.