Description:
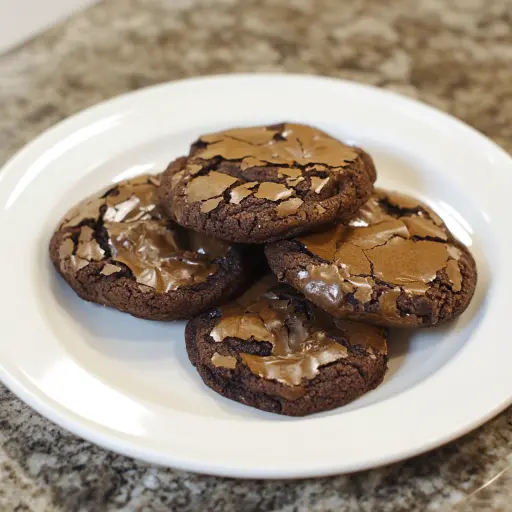
Forget boxed brownies for a moment! This simple recipe transforms your favorite brownie mix into chewy, fudgy, and incredibly delicious cookies. With endless mix-in possibilities, you can create a batch tailored to your exact cravings. Perfect for a quick dessert, bake sale, or anytime you need a sweet treat without the fuss.
Ingredients:
- 1 (18-20oz) box brownie mix (any brand – dark chocolate, fudge, or even a caramel swirl will work!)
- ½ cup all-purpose flour (this helps to give the cookies structure and prevent them from spreading too thin)
- ⅓ cup vegetable oil (adds moisture and richness to the cookies)
- 2 large eggs (bind the ingredients together and contribute to the chewy texture)
Mix-In Ideas (Optional):
- ½ cup chocolate chips (milk chocolate, semi-sweet, dark chocolate, white chocolate – the choice is yours!)
- ½ cup chopped nuts (walnuts, pecans, almonds, or even macadamia nuts add a delightful crunch)
- ¼ cup caramel bits (for a gooey, caramel-infused cookie)
- 1 tsp instant espresso powder (enhances the chocolate flavor and adds a subtle coffee kick – especially great with dark chocolate mixes)
- ½ cup crushed Oreos (creates a cookies-and-cream sensation)
- Other possibilities: Sprinkles, toffee bits, peanut butter chips, dried cranberries, mini marshmallows, or even pretzels!
Preparation:
Step 1: Preheat and Prep: Preheat your oven to 350°F (175°C). This is crucial for even baking. Line your baking sheets with parchment paper. Parchment paper is a lifesaver because it prevents the cookies from sticking to the pan, ensures easy cleanup, and helps the cookies bake more evenly. If you don’t have parchment paper, you can lightly grease the baking sheets with cooking spray, but parchment is highly recommended.
Step 2: Combine Dry Ingredients: In a large mixing bowl, whisk together the brownie mix and all-purpose flour. Whisking is important because it helps to break up any lumps in the brownie mix and ensures that the flour is evenly distributed. This will result in a smoother cookie dough. Make sure to use a bowl big enough to comfortably hold all the ingredients.
Step 3: Incorporate Wet Ingredients: Add the vegetable oil and eggs to the bowl with the dry ingredients. Stir until everything is fully combined. The dough will be quite thick, almost like a very dense brownie batter. Don’t overmix at this stage; just stir until everything comes together. Overmixing can lead to tough cookies.
Step 4: Fold in Mix-Ins (Optional): If you’re using any mix-ins (chocolate chips, nuts, caramel bits, etc.), gently fold them into the dough. Be careful not to overmix, as this can toughen the dough. Evenly distribute the mix-ins throughout the dough for the best results. If you’re feeling adventurous, divide the dough into smaller portions and incorporate different mix-ins into each portion!
Step 5: Scoop and Bake: Using a cookie scoop or a spoon, scoop about 1.5 tablespoons of dough per cookie. Gently roll the dough into balls if needed. Space the cookies about 2 inches apart on the prepared baking sheets. This allows the cookies enough room to spread during baking without sticking together. Bake for 10-12 minutes, or until the edges are set but the centers still look slightly underdone. Remember, underbaking slightly will result in fudgier cookies. Keep a close eye on them during the last few minutes of baking to prevent burning.
Step 6: Cool and Enjoy: Let the cookies cool on the baking sheet for about 5 minutes before transferring them to a wire rack to cool completely. This allows them to set up a bit and prevents them from breaking when you move them. Cooling them completely on the wire rack ensures that they don’t continue to bake from the residual heat of the baking sheet. Now comes the best part – enjoy your delicious homemade brownie mix cookies!
Why you will love this recipe:
This recipe is a game-changer for several reasons:
- Incredibly Easy: It requires minimal ingredients and steps, making it perfect for beginner bakers or anyone short on time.
- Super Customizable: The mix-in possibilities are endless! You can tailor the cookies to your exact preferences and create a different flavor combination every time.
- Fudgy and Chewy Texture: Unlike some cookie recipes that can be dry or crumbly, these cookies are wonderfully fudgy and chewy, thanks to the brownie mix.
- Perfect for a Quick Dessert: When a sweet craving strikes, you can whip up a batch of these cookies in under 30 minutes.
- Great for Using Up Leftover Brownie Mix: If you have a half-used box of brownie mix sitting in your pantry, this is the perfect way to use it up!
- Fun for Kids: Kids will love helping to make these cookies, especially when it comes to choosing and adding the mix-ins.
- Crowd-Pleaser: These cookies are always a hit at parties, bake sales, or any gathering.
Serving Suggestions:
- Serve warm with a scoop of vanilla ice cream.
- Pair with a glass of cold milk or a cup of hot coffee.
- Pack them in lunchboxes for a special treat.
- Gift them to friends or neighbors.
- Use them to make ice cream sandwiches.
- Crumble them over yogurt or parfaits.
- Dip them in melted chocolate for an extra decadent treat.
Tips:
- Don’t Overbake: Overbaking will result in dry, crumbly cookies. Keep a close eye on them and remove them from the oven when the edges are set but the centers are still slightly soft.
- Use High-Quality Brownie Mix: The quality of the brownie mix will affect the taste of the cookies. Choose a brand that you enjoy and that is known for its rich chocolate flavor.
- Experiment with Mix-Ins: Don’t be afraid to get creative with the mix-ins. Try different combinations of nuts, chocolate chips, candies, and dried fruits.
- Chill the Dough: For thicker cookies that don’t spread as much, chill the dough in the refrigerator for about 30 minutes before baking.
- Store Properly: Store the cookies in an airtight container at room temperature for up to 3 days.
- Freeze for Later: You can also freeze the baked cookies for up to 2 months.
- Adjust the Baking Time: If you live at a high altitude, you may need to adjust the baking time. Start by reducing the baking time by a minute or two and then check the cookies frequently.
- For extra fudgy cookies: Use a brownie mix that specifies “fudgy” on the box.
Prep Time: 10 minutes Cook Time: 10-12 minutes Total Time: 20-22 minutes
Nutritional Information:
(Note: Nutritional information will vary depending on the brand of brownie mix and the mix-ins used. The following is an estimate based on an average brownie mix and no additional mix-ins.)
Calories: Approximately 150-200 per cookie Protein: Approximately 2-3 grams per cookie Sodium: Approximately 100-150mg per cookie
Conclusion:
These Brownie Mix Cookies are a testament to the fact that you don’t need to spend hours in the kitchen to create delicious, homemade treats. This recipe offers a shortcut to cookie perfection, delivering fudgy, chewy, and endlessly customizable cookies with minimal effort. Whether you’re a seasoned baker or a kitchen novice, you’ll find these cookies incredibly easy and satisfying to make. So, grab your favorite brownie mix and get ready to bake up a batch of pure cookie bliss! Enjoy the magic of transforming a simple mix into something extraordinary.
Questions and Answers:
Q1: Can I use a gluten-free brownie mix for this recipe?
A: Yes, you can absolutely use a gluten-free brownie mix! Just be sure to use a gluten-free all-purpose flour blend as well. The results may vary slightly in texture, but the cookies should still be delicious. You might want to experiment with adding a touch more liquid (a teaspoon or two of milk) if the dough seems too dry.
Q2: What if I don’t have vegetable oil? Can I use another type of oil?
A: Yes, you can substitute vegetable oil with another neutral-flavored oil, such as canola oil, sunflower oil, or even melted coconut oil (make sure it’s cooled slightly). Avoid using strong-flavored oils like olive oil, as they can alter the taste of the cookies.
Q3: My cookies spread too thin. What did I do wrong?
A: There are a few reasons why your cookies might be spreading too thin. First, make sure your oven temperature is accurate. Second, make sure you’re using the correct amount of flour. Too little flour can cause the cookies to spread. Finally, chilling the dough before baking can help to prevent spreading.
Q4: Can I make these cookies ahead of time?
A: Yes, you can definitely make these cookies ahead of time. They can be stored in an airtight container at room temperature for up to 3 days. You can also freeze them for up to 2 months. To freeze, let the cookies cool completely, then place them in a single layer on a baking sheet and freeze for about 30 minutes. Once they’re frozen solid, transfer them to a freezer bag or container.
Q5: What if I don’t have all-purpose flour? Is there a substitute I can use?
A: While all-purpose flour works best for giving the cookies structure, you can try using cake flour. However, be aware that the cookies may be slightly more delicate and crumbly. You might also need to adjust the amount of liquid slightly. Using whole wheat flour is not recommended, as it can make the cookies too dense and chewy.


