Description
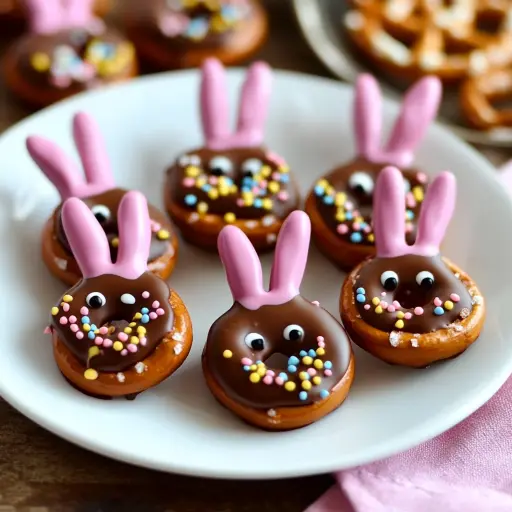
These Chocolate-Dipped Bunny Pretzels are an adorable and incredibly easy treat perfect for Easter, springtime celebrations, or just a fun baking project with kids. They combine the salty crunch of pretzels with the sweet indulgence of melted chocolate, creating a delightful flavor contrast that everyone will love. The simple assembly and decoration process makes them a fantastic activity for all ages, and the result is a batch of charming, edible bunnies that are as pleasing to the eye as they are to the palate. These bunny pretzels are not only a delicious snack, but also make wonderful party favors, gifts, or additions to Easter baskets. They are completely customizable with different types of chocolate, sprinkles, candies, and even edible markers, allowing for endless creativity and personalization. Whether you’re an experienced baker or a novice, these Chocolate-Dipped Bunny Pretzels are sure to bring smiles and sweet moments to your home.
Ingredients:
- 12–15 large pretzel rings
- 12–15 small pretzel twists (for the head)
- 1 cup milk or dark chocolate (or candy melts)
- Colorful sprinkles
- Mini candy decorations for eyes and nose (like mini M&Ms or candy pearls)
- Optional: edible food markers or icing for whiskers
- Wax paper or parchment paper
- Microwave-safe bowl or double boiler
Preparation:
Step 1: Prepare Your Workspace and Ingredients
Before you begin, gather all your ingredients and equipment. Lay out a large sheet of wax paper or parchment paper on a flat surface. This will prevent the pretzels from sticking and make cleanup a breeze. Organize your sprinkles, mini candies, and edible markers (if using) in small bowls so they are easily accessible. Having everything within reach will streamline the assembly process and help prevent the chocolate from setting before you can decorate.
Step 2: Melt the Chocolate
The key to successful chocolate-dipped pretzels is to achieve a smooth, evenly melted chocolate. You have two options for melting: microwave or double boiler.
Microwave Method:
Place the chocolate or candy melts in a microwave-safe bowl. Microwave in 30-second intervals, stirring well after each interval. Continue this process until the chocolate is almost completely melted. Be careful not to overheat the chocolate, as it can burn and become grainy. Once it’s almost melted, stir continuously until the remaining pieces melt from the residual heat and the chocolate is smooth and glossy.
Double Boiler Method:
Fill a saucepan with about an inch or two of water and bring it to a simmer over medium heat. Place a heat-safe bowl on top of the saucepan, ensuring the bottom of the bowl does not touch the water. Add the chocolate or candy melts to the bowl and stir occasionally until completely melted and smooth. The gentle heat from the steam will prevent the chocolate from burning, resulting in a perfectly melted consistency.
Step 3: Assemble the Bunny Bodies
Take one large pretzel ring at a time and carefully dip it into the melted chocolate, ensuring it is fully coated. Use a fork or dipping tools to help submerge the pretzel and remove any excess chocolate. Place the chocolate-covered pretzel on the prepared wax paper or parchment paper. Repeat this process for all the large pretzel rings, spacing them apart on the sheet.
Step 4: Assemble the Bunny Heads
Now, take one small pretzel twist and dip it into the melted chocolate. Ensure it is fully coated, just like the larger pretzels. Carefully attach the chocolate-covered small pretzel to the top of the larger pretzel ring, forming the bunny’s head. The loops of the small pretzel twist will serve as the bunny’s ears. If desired, use a small amount of extra melted chocolate as “glue” to secure the head to the body. Repeat this process for all the remaining pretzels.
Step 5: Decorate the Bunnies
This is where the fun begins! While the chocolate is still wet, immediately add colorful sprinkles over the body and ears of the bunny. Carefully place mini candy decorations for the eyes and nose on the head area. Get creative with the decorations to give each bunny a unique expression. If using edible food markers or icing, draw whiskers on the face to add a touch of whimsy. For extra cuteness, you can even attach small candy hearts as paws or create bow ties with colored icing. The possibilities are endless!
Step 6: Set and Serve
Once all the bunny pretzels are decorated, allow them to sit undisturbed at room temperature until the chocolate has hardened completely. This typically takes about 20-30 minutes. You can speed up the process by placing the pretzels in the refrigerator for about 10-15 minutes. Once the chocolate is set, carefully peel the pretzels off the wax paper or parchment paper. Your adorable bunny pretzels are now ready to serve!
Why you will love this recipe
This recipe is undeniably appealing for several reasons. First, it’s incredibly simple and requires minimal baking experience, making it accessible for anyone to try, even with children. The hands-on nature of assembling and decorating the bunnies makes it a fun and engaging activity for all ages. Second, the combination of salty pretzels and sweet chocolate offers a delightful flavor contrast that is universally enjoyed. The pretzels provide a satisfying crunch, while the chocolate adds a smooth and decadent element. Third, these Chocolate-Dipped Bunny Pretzels are highly customizable. You can experiment with different types of chocolate, various sprinkles, candies, and even edible markers to create unique and personalized bunnies. This allows for endless creativity and ensures that each batch is special. Finally, the finished product is not only delicious but also visually appealing, making these bunny pretzels a perfect addition to any Easter celebration or springtime gathering. They are guaranteed to bring smiles and sweet moments to everyone who tries them.
Serving Suggestions:
- Easter Baskets: Place a few bunny pretzels in Easter baskets alongside other treats like chocolate eggs and jelly beans.
- Party Favors: Wrap individual bunny pretzels in cellophane bags and tie with ribbon for adorable party favors.
- Dessert Platter: Arrange the bunny pretzels on a dessert platter with other sweets for a festive and eye-catching display.
- Snack Time: Enjoy the bunny pretzels as a simple and satisfying snack any time of day.
- Gifts: Package a batch of bunny pretzels in a decorative box or tin as a thoughtful homemade gift.
Tips:
- Ensure the pretzel twists are proportionate for creating a distinct head and body shape. Experiment with different sizes of pretzels to find the perfect combination.
- Use a small amount of extra melted chocolate as “glue” if needed to secure the head and ears. This is especially helpful if the chocolate starts to harden before you finish assembling.
- Be creative with the decorations to give each bunny a unique expression. Try using different colored sprinkles, various types of candies, and even edible glitter for added sparkle.
- For a neater appearance, use dipping tools or forks to help coat the pretzels in chocolate. This will prevent excess chocolate from dripping and create a smoother finish.
- If you don’t have mini pretzels, you can use broken pretzel sticks for the ears. Simply dip the ends in chocolate and attach them to the head.
- Store the finished bunny pretzels in an airtight container at room temperature to maintain their freshness and prevent the chocolate from melting.
- If you are making a large batch, work in smaller increments to prevent the chocolate from hardening before you can decorate all the pretzels.
- If the chocolate starts to thicken while you are working, reheat it in the microwave in short intervals or over the double boiler.
- Consider using different types of chocolate, such as white chocolate, dark chocolate, or even flavored candy melts, to create a variety of bunny pretzels.
Prep Time: 15 minutes
Cook Time: 5 minutes
Total Time: 20 minutes (plus setting time)
Nutritional Information: (Estimates can vary depending on specific ingredients used)
- Calories: Approximately 150-200 per pretzel
- Protein: 2-3 grams per pretzel
- Sodium: 150-200 mg per pretzel
Conclusion
These Chocolate-Dipped Bunny Pretzels are a delightful and easy-to-make treat that’s perfect for any occasion, especially Easter. The combination of salty pretzels and sweet chocolate, along with the fun and customizable decoration process, makes them a hit with both kids and adults. Whether you’re looking for a festive snack, a creative activity, or a charming gift, these bunny pretzels are sure to bring joy and sweetness to your day. With simple ingredients and minimal effort, you can create a batch of adorable and delicious bunnies that will be the star of your celebration. So gather your supplies, get creative with the decorations, and enjoy the process of making these delightful Chocolate-Dipped Bunny Pretzels!
Questions and Answers:
Q1: Can I use different types of chocolate for this recipe?
A: Absolutely! Feel free to experiment with various types of chocolate, such as white chocolate, dark chocolate, semi-sweet chocolate, or even flavored candy melts. Each type of chocolate will impart a unique flavor and color to the bunny pretzels. For example, white chocolate can be colored with food coloring to create vibrant and festive bunnies. Dark chocolate provides a richer and more intense flavor, while milk chocolate offers a classic sweetness. Candy melts come in a wide array of colors and flavors, allowing for endless customization.
Q2: What if I don’t have mini pretzel twists for the head?
A: If you don’t have mini pretzel twists, you can use alternative options for the bunny head. One option is to break pretzel sticks into smaller pieces and dip the ends in chocolate, attaching them to the larger pretzel ring to create the ears. Alternatively, you can use small marshmallows or even chocolate chips to form the head. Another creative idea is to use a small cookie cutter to cut out bunny head shapes from fondant or marzipan and attach them to the pretzel with melted chocolate.
Q3: How do I prevent the chocolate from hardening too quickly while I’m decorating?
A: To prevent the chocolate from hardening too quickly, keep it warm throughout the decorating process. If you are using the microwave method, reheat the chocolate in short intervals (10-15 seconds) as needed, stirring well after each interval. If you are using the double boiler method, ensure the water in the saucepan remains at a simmer to keep the chocolate melted and smooth. Working in smaller batches can also help prevent the chocolate from hardening before you have a chance to decorate all the pretzels.
Q4: What is the best way to store these Chocolate-Dipped Bunny Pretzels?
A: The best way to store these Chocolate-Dipped Bunny Pretzels is in an airtight container at room temperature. This will help maintain their freshness and prevent the chocolate from melting or becoming sticky. Avoid storing them in the refrigerator, as the chocolate can develop a white film (chocolate bloom) due to the temperature change. Properly stored, the bunny pretzels can last for up to a week.
Q5: Can I make these bunny pretzels ahead of time?
A: Yes, you can definitely make these bunny pretzels ahead of time. They are a great make-ahead treat for parties, gatherings, or Easter celebrations. Prepare the pretzels as directed, allow the chocolate to set completely, and then store them in an airtight container at room temperature until you are ready to serve them. Making them a day or two in advance will save you time and stress on the day of your event.