Recipe Name
Description
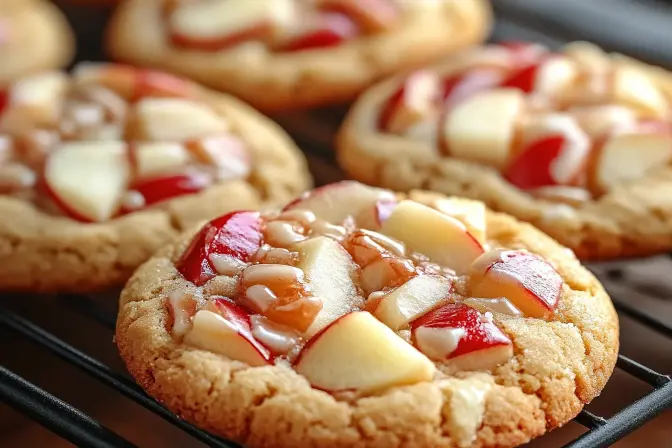
These cookies perfectly capture the essence of a classic candy apple. Tart Granny Smith apples, chewy caramel bits, and a crisp candy coating combine to create a delicious and irresistible treat that everyone will love. These cookies are perfect for fall, holidays, or anytime you crave a nostalgic indulgence with a homemade touch.
Ingredients:
- 2 ¾ cups all-purpose flour
- 1 teaspoon baking soda
- ½ teaspoon salt
- 1 teaspoon ground cinnamon
- 1 cup unsalted butter, room temperature
- ¾ cup light brown sugar, packed
- ½ cup granulated sugar
- 2 large eggs
- 2 teaspoons pure vanilla extract
- 1 ½ cups finely diced Granny Smith apples (about 2 medium apples)
- 1 cup caramel bits
- 16 ounces red candy melts for coating
Preparation:
step 1
In a medium bowl, whisk together flour, baking soda, salt, and cinnamon. This ensures the dry ingredients are evenly distributed throughout the cookie dough, leading to a consistent texture and flavor in every bite.
Step 2:
In a stand mixer fitted with the paddle attachment (or using a hand mixer), cream butter and both sugars until light and fluffy, about 5 minutes. Don’t rush this step – it’s crucial for the perfect texture! Creaming the butter and sugar properly introduces air into the mixture, creating a lighter, more tender cookie. This step also helps dissolve the sugar, resulting in a smoother dough. Ensure your butter is truly at room temperature (soft but not melted) for optimal creaming.
Step 3:
Beat in eggs one at a time, then vanilla extract, scraping down the sides of the bowl as needed. Incorporating the eggs one at a time allows each egg to emulsify properly into the batter, preventing the mixture from curdling. Scraping down the sides of the bowl ensures that all ingredients are evenly incorporated, resulting in a uniform dough. The vanilla extract adds a warm, comforting flavor that complements the apple and caramel.
Step 4:
Gradually mix in the dry ingredients until just combined. The dough will be quite thick. Overmixing the dough after adding the flour can lead to tough cookies. Mix just until the dry ingredients are incorporated, leaving a slightly shaggy dough. The dough will be thick due to the high butter content and addition of apples.
Step 5:
Pat apple pieces very dry with paper towels. Gently fold in diced apples and caramel bits by hand. Removing excess moisture from the apples prevents the cookies from becoming soggy. Gently folding in the apples and caramel bits ensures they are evenly distributed throughout the dough without overmixing it.
Step 6:
Cover dough and refrigerate for at least 2 hours or overnight. Chilling the dough allows the gluten to relax, resulting in a more tender cookie. It also allows the flavors to meld together, creating a richer, more complex flavor profile. Chilling also helps prevent the cookies from spreading too much during baking.
Step 7:
When ready to bake, preheat oven to 350°F. Line baking sheets with silicone mats or parchment paper. Preheat the oven to ensure consistent baking temperature. Lining the baking sheets prevents the cookies from sticking and makes cleanup easier. Silicone mats provide even heat distribution, while parchment paper allows for easy removal of the baked cookies.
Step 8:
Scoop chilled dough into 2-tablespoon balls and place 2 inches apart on prepared sheets. Using a cookie scoop ensures uniform cookie size, which results in even baking. Placing the cookies 2 inches apart allows them to spread without sticking together.
Step 9:
Bake for 12-14 minutes until edges are lightly golden but centers still look slightly underbaked. Baking until the edges are golden but the centers are slightly underbaked ensures a soft, chewy cookie. The cookies will continue to bake slightly as they cool on the baking sheet.
Step 10:
Cool on baking sheets for 5 minutes, then transfer to wire racks to cool completely. Cooling the cookies on the baking sheet for a few minutes allows them to set slightly, preventing them from breaking when transferred to the wire rack. Cooling them completely on a wire rack prevents them from becoming soggy.
Step 11:
Melt candy melts according to package directions. Dip each cooled cookie halfway into melted candy, or drizzle over top. Place on wax paper until coating sets. Melting the candy melts according to package directions ensures a smooth, even coating. Dipping or drizzling the cookies adds the signature candy apple element. Placing them on wax paper prevents them from sticking.
Why you will love this recipe
- Nostalgic Flavor: These cookies perfectly mimic the taste of a classic candy apple, evoking childhood memories and comforting fall feelings.
- Chewy Texture: The combination of apples, caramel bits, and perfectly baked dough creates a delightfully chewy texture that is incredibly satisfying.
- Easy to Customize: You can easily adapt this recipe to your preferences by using different types of apples, caramel flavors, or candy melt colors.
- Kid-Friendly: These cookies are a hit with kids and adults alike. They are fun to make and even more fun to eat!
- Perfect for Special Occasions: These cookies are a festive treat perfect for Halloween, Thanksgiving, Christmas, or any fall gathering.
- Impressive Presentation: The vibrant red candy coating makes these cookies visually appealing, making them a beautiful addition to any dessert table.
- Relatively Simple to Make: While the recipe requires a few steps, it is straightforward and easy to follow, even for beginner bakers.
- Homemade Goodness: These cookies offer a delicious homemade alternative to store-bought candy apples, providing a more wholesome and flavorful treat.
- Portable and Convenient: Unlike actual candy apples, these cookies are easy to transport and enjoy on the go, making them perfect for parties or lunchboxes.
- Adaptable for Dietary Needs: With slight modifications, this recipe can be adapted to be gluten-free or vegan, allowing more people to enjoy this delightful treat.
Serving Suggestions:
- Serve these cookies with a cold glass of milk or a warm cup of apple cider for the ultimate fall experience.
- Package them in cellophane bags tied with ribbons as a thoughtful homemade gift.
- Include them in a dessert platter alongside other fall favorites like pumpkin pie or apple crisp.
- Crush some of the cookies and sprinkle them over ice cream for a candy apple-flavored sundae.
- Enjoy them as a sweet treat after a hearty fall dinner.
- Pair them with a cheese board for a sweet and savory combination.
- Serve them warm with a scoop of vanilla ice cream for an extra decadent dessert.
- Offer them as a party favor at a Halloween or fall-themed party.
- Stack them high on a platter for a visually stunning dessert display.
- Enjoy them as a simple and satisfying snack anytime you crave something sweet and apple-y.
Tips:
- For the best flavor, use high-quality Granny Smith apples that are firm and tart.
- Ensure your butter is truly at room temperature for optimal creaming.
- Don’t skip the chilling time! It’s crucial for the texture and prevents excessive spreading.
- Dice the apples into small, uniform pieces for even distribution throughout the cookies.
- Pat the apples dry to remove excess moisture and prevent soggy cookies.
- Use a cookie scoop to ensure consistent cookie size and even baking.
- Don’t overbake the cookies – they should be lightly golden around the edges but still slightly soft in the center.
- Melt the candy melts according to the package instructions to avoid scorching or seizing.
- Allow the candy coating to set completely before storing the cookies to prevent sticking.
- Store the cookies in an airtight container with wax paper between layers to maintain their freshness.
- Experiment with different flavors of caramel bits or candy melts to create your own unique variations.
- If you don’t have caramel bits, you can chop up caramel candies instead.
- For a more intense apple flavor, add a teaspoon of apple pie spice to the dry ingredients.
- If the candy coating is too thick, add a teaspoon of vegetable oil or shortening to thin it out.
- Use a fork to drizzle the candy coating over the cookies for a rustic, less uniform look.
- Sprinkle chopped nuts or sprinkles over the candy coating before it sets for added texture and flavor.
Prep Time:
30 minutes (plus 2 hours chilling time)
Cook Time:
12-14 minutes
Total Time:
2 hours 45 minutes
Nutritional Information:
(Per Cookie – Approximate)
- Calories: 285
- Protein: 3g
- Sodium: 115mg
Conclusion
These Candy Apple Cookies are a delightful twist on a classic fall treat. The combination of tart apples, chewy caramel, and a sweet candy coating creates a cookie that’s both nostalgic and irresistible. They are perfect for sharing with friends and family or enjoying as a special treat all to yourself. With their festive appearance and delicious flavor, these cookies are sure to become a new favorite in your baking repertoire. So, gather your ingredients, preheat your oven, and get ready to bake up a batch of these crowd-pleasing Candy Apple Cookies!
Questions and Answers
Q1: Can I use a different type of apple besides Granny Smith?
A: Yes, while Granny Smith apples provide the perfect tartness to balance the sweetness of the cookie, you can definitely experiment with other apple varieties. Honeycrisp apples will add a touch of sweetness, while Fuji apples will provide a softer texture. If using a sweeter apple, you might consider reducing the amount of sugar in the recipe slightly. Just be sure to choose an apple that holds its shape well during baking and doesn’t release too much moisture.
Q2: What can I do if my candy melts are too thick and difficult to work with?
A: If your candy melts are too thick, there are a couple of easy solutions. The first is to add a small amount of vegetable oil or shortening (about a teaspoon at a time) to the melted candy and stir until smooth. Be careful not to add too much, as this can thin the candy too much and prevent it from setting properly. Another option is to use a double boiler or a microwave-safe bowl set over a saucepan of simmering water to gently heat the candy and thin it out. Again, be careful not to overheat the candy, as this can cause it to burn or seize.
Q3: Can I freeze the cookie dough for later use?
A: Absolutely! Freezing the cookie dough is a great way to have freshly baked cookies on hand whenever you crave them. Simply scoop the dough into balls, place them on a baking sheet lined with parchment paper, and freeze until solid. Once frozen, transfer the dough balls to a freezer-safe bag or container. The dough can be stored in the freezer for up to 3 months. When ready to bake, simply thaw the dough in the refrigerator overnight and bake as directed in the recipe.
Q4: My cookies spread too much during baking. What did I do wrong?
A: Several factors can cause cookies to spread too much during baking. The most common reason is that the butter was too warm or melted. Ensure that your butter is truly at room temperature (soft but not melted) before creaming it with the sugar. Another reason could be that the dough wasn’t chilled long enough. Chilling the dough allows the gluten to relax and prevents the cookies from spreading excessively. Finally, using too much sugar or not enough flour can also contribute to spreading. Make sure you measure your ingredients accurately and follow the recipe instructions carefully.
Q5: Can I make these cookies gluten-free?
A: Yes, you can adapt this recipe to be gluten-free by substituting the all-purpose flour with a gluten-free all-purpose flour blend. Look for a blend that contains xanthan gum, which helps provide structure and binding in gluten-free baked goods. Be aware that the texture of the cookies may be slightly different when using gluten-free flour. They might be a bit more crumbly or dense than the original recipe. Experiment with different gluten-free flour blends to find one that you prefer.