scription
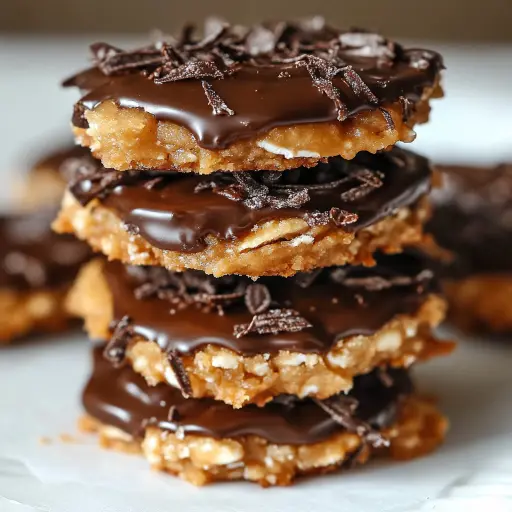
Craving those classic Girl Scout Samoas, but it’s not cookie season? Or maybe you just want to know exactly what’s going into your treat? Look no further! This recipe lets you create a batch of delicious, homemade Samoas that taste remarkably like the real deal, maybe even better! We’re talking buttery shortbread cookies topped with chewy caramel and toasted coconut, all drizzled with rich, dark chocolate. Prepare to be transported back to your childhood – one delicious bite at a time! These homemade versions are perfect for sharing (or not!), gifting, or simply indulging in a nostalgic treat anytime you want.
Ingredients:
For the Cookies:
- 1 cup (2 sticks or 226g) unsalted butter, softened
- 1/2 cup (100g) granulated sugar
- 2 cups (250g) all-purpose flour, plus more for dusting
- 1/4 teaspoon baking powder
- 1/2 teaspoon salt
- 1/2 teaspoon vanilla extract
- 2 tablespoons milk (whole milk is preferred, but any kind will work)
For the Topping:
- 3 cups (approximately 240g) sweetened shredded coconut
- 12 oz (approximately 340g) chewy caramels, unwrapped (I recommend Werther’s Originals Soft Caramels or similar)
- 3 tablespoons milk (whole milk preferred)
- 1/4 teaspoon salt
For the Chocolate:
- 8 oz (approximately 225g) semisweet chocolate, good quality, chopped
Preparation:
Step 1: Make the Cookies – Preheat and Prep
Preheat your oven to 350°F (175°C). This is a crucial step because consistent oven temperature is essential for even baking. Line your baking sheets with parchment paper. Parchment paper prevents the cookies from sticking, makes cleanup a breeze, and ensures they release easily without breaking. Don’t skip this step!
Step 2: Cream Butter and Sugar
In a large mixing bowl (or the bowl of your stand mixer), cream together the softened butter and granulated sugar. Beat on medium speed until light and fluffy. This process incorporates air into the butter and sugar, creating a tender cookie base. The mixture should lighten in color and become noticeably more voluminous. This usually takes about 3-5 minutes.
Step 3: Add Dry Ingredients
In a separate bowl, whisk together the all-purpose flour, baking powder, and salt. This ensures the baking powder and salt are evenly distributed throughout the flour, leading to a consistent rise and flavor in the cookies. Gradually add the dry ingredients to the creamed butter and sugar, mixing on low speed until just combined. Be careful not to overmix; overmixing develops the gluten in the flour, resulting in a tough cookie.
Step 4: Add Wet Ingredients and Form Dough
Add the vanilla extract and milk to the dough. Mix on low speed until a dough forms. The dough should come together easily and be slightly sticky. If the dough seems too dry, add a teaspoon of milk at a time until it reaches the correct consistency.
Step 5: Roll and Cut Out Cookies
Lightly flour a clean work surface. Roll the dough out to about 1/4 inch thickness. Use a 2-inch round cookie cutter to cut out circles. Then, use a smaller cookie cutter (about 3/4 inch) or a piping tip to cut out the centers. The center cut-out is what gives the Samoas their signature ring shape.
Step 6: Bake Cookies
Place the cut-out cookies onto the prepared baking sheets, leaving a little space between each cookie. Bake for 10-12 minutes, or until the edges are lightly golden brown. Watch them carefully, as they can burn easily. Let the cookies cool completely on the baking sheets before handling.
Step 7: Prepare the Topping – Toast the Coconut
While the cookies are baking (or cooling), prepare the topping. Spread the shredded coconut on a baking sheet. Toast in the oven at 350°F (175°C) for 8-10 minutes, stirring occasionally. Keep a close eye on the coconut as it can burn quickly. The coconut is done when it’s lightly golden brown and fragrant. Remove from the oven and let cool slightly. Toasting the coconut enhances its flavor and adds a delightful texture to the cookies.
Step 8: Melt the Caramels
In a microwave-safe bowl, combine the unwrapped caramels, milk, and salt. Microwave in 30-second intervals, stirring in between, until the caramels are completely melted and smooth. Be careful not to overheat the caramels, as they can become hard and grainy. If you prefer, you can melt the caramels in a double boiler on the stovetop, stirring constantly until smooth.
Step 9: Combine Coconut and Caramel
Add the toasted coconut to the melted caramel and mix well until the coconut is evenly coated.
Step 10: Assemble the Cookies – Top with Caramel-Coconut
Once the cookies are completely cool, spread a generous amount of the caramel-coconut mixture on top of each cookie. Be sure to cover the entire surface of the cookie, including the center ring.
Step 11: Melt the Chocolate
Melt the semisweet chocolate in a double boiler or in the microwave in 30-second intervals, stirring in between, until smooth.
Step 12: Dip and Drizzle
Dip the bottoms of the cookies in the melted chocolate and place them on parchment paper to set. Then, drizzle the remaining chocolate over the tops of the cookies. Get creative with your drizzle pattern!
Step 13: Let Set
Allow the cookies to set until the chocolate is firm. This can take a few hours at room temperature, or you can speed up the process by refrigerating them.
Why You’ll Love This Recipe
- Tastes Like the Real Deal: The combination of buttery shortbread, chewy caramel, toasted coconut, and rich chocolate creates a flavor profile that’s incredibly close to the original Girl Scout Samoas.
- Customizable: You can adjust the sweetness and chocolate intensity to your liking. Use dark chocolate for a more sophisticated flavor or add a pinch of sea salt to the caramel for a salted caramel twist.
- Homemade with Love: Making these cookies from scratch means you know exactly what’s going into them. No preservatives or artificial ingredients!
- Perfect for Gifting: These homemade Samoas make a thoughtful and delicious gift for friends, family, or neighbors.
Serving Suggestions:
- Enjoy with a glass of cold milk or a cup of hot coffee.
- Serve as a dessert at parties or gatherings.
- Package them in a decorative tin or box for a thoughtful homemade gift.
- Add a scoop of vanilla ice cream for an extra decadent treat.
Tips:
- Use Softened Butter: Make sure your butter is softened, not melted, for the best results. Softened butter will cream together with the sugar more easily and create a tender cookie.
- Don’t Overmix the Dough: Overmixing develops the gluten in the flour, resulting in a tough cookie. Mix until just combined.
- Toast the Coconut: Toasting the coconut enhances its flavor and adds a delightful texture to the cookies.
- Use High-Quality Chocolate: The quality of the chocolate will impact the overall taste of the cookies. Use a good-quality semisweet chocolate for the best results.
- Work Quickly with the Caramel: The caramel mixture can set up quickly, so work quickly when spreading it on the cookies. If it becomes too thick, you can microwave it for a few seconds to soften it.
- Cool Completely: Ensure the cookies are completely cool before topping with the caramel and chocolate.
Time Breakdown:
- Prep Time: 30 minutes
- Cook Time: 10-12 minutes (cookies) + 8-10 minutes (coconut)
- Total Time: Approximately 1 hour (plus setting time)
Nutritional Information (per cookie, approximate):
- Calories: 250-300 (estimate based on ingredient amounts)
- Protein: 2-3 grams
- Sodium: 50-75mg
(Please note: This is an estimate and can vary depending on the specific brands and quantities used.)
Conclusion
These homemade Samoas are a labor of love, but the result is well worth the effort. They’re a perfect blend of buttery shortbread, chewy caramel, toasted coconut, and rich chocolate – a truly irresistible treat. So, gather your ingredients, put on your apron, and get ready to create a batch of these classic cookies that will impress everyone who tries them. Enjoy!
Q&A about Homemade Samoas
Q1: Can I make these cookies ahead of time?
A: Absolutely! The cookies can be made a day or two in advance and stored in an airtight container at room temperature. You can also prepare the caramel-coconut topping ahead of time and store it in the refrigerator. Just be sure to bring it to room temperature before spreading it on the cookies. I would recommend keeping the components separate until you are ready to assemble them so the cookies remain fresh.
Q2: Can I freeze these cookies?
A: Yes, you can freeze these cookies! Once the chocolate has set, place them in an airtight container or freezer bag. They can be frozen for up to 2 months. Thaw them at room temperature before serving.
Q3: I don’t have a round cookie cutter. Can I use something else?
A: Of course! You can use any shape cookie cutter you like. If you don’t have cookie cutters, you can even use a knife to cut the dough into squares or rectangles. The important thing is to cut out the center ring to give them that signature Samoa look.
Q4: Can I use dark chocolate instead of semisweet chocolate?
A: Definitely! Using dark chocolate will give the cookies a richer, more intense chocolate flavor. You can also use milk chocolate if you prefer a sweeter taste. Feel free to experiment and find what you like best!
Q5: My caramel topping is too thick. What can I do?
A: If your caramel topping is too thick, you can microwave it for a few seconds to soften it. Start with 10-second intervals, stirring in between, until it reaches the desired consistency. Be careful not to overheat it, as it can become hard and grainy.


