Description:
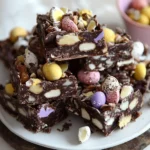
This Chocolate Easter Egg Nest Cake is a decadent and festive dessert perfect for Easter celebrations. A rich, moist chocolate cake is draped in a luscious dark chocolate ganache and topped with a delicate chocolate nest filled with colorful mini chocolate eggs. It’s a show-stopping centerpiece that’s surprisingly easy to make and guaranteed to impress your guests. This cake combines rich chocolate flavors with a whimsical design, making it an ideal treat for both kids and adults alike. Every bite is an explosion of textures and tastes, from the soft cake to the smooth ganache and the crunchy chocolate nest.
Ingredients:
FOR THE CHOCOLATE CAKE:
- 1 ¾ cups (220g) all-purpose flour
- ¾ cup (75g) unsweetened cocoa powder
- 2 cups (400g) granulated sugar
- 2 teaspoons baking powder
- 1 teaspoon baking soda
- ½ teaspoon salt
- 1 cup (240ml) buttermilk
- ½ cup (120ml) vegetable oil
- 2 large eggs
- 2 teaspoons vanilla extract
- 1 cup (240ml) hot water or coffee
FOR THE CHOCOLATE GANACHE:
- 1 cup (240ml) heavy cream
- 8 oz (225g) dark chocolate, chopped
- 1 tablespoon unsalted butter
FOR THE CHOCOLATE NEST:
- 6 oz (170g) dark chocolate, melted
- Parchment paper
- Mini chocolate eggs or candy-coated Easter eggs
Preparation:
Step 1: Prepare the Chocolate Cake
Preheat your oven to 350°F (175°C). Proper preheating ensures the cake bakes evenly. While the oven is heating, grease and line a 9-inch round cake pan with parchment paper. This step is crucial to prevent the cake from sticking to the pan and allows for easy removal once it’s cooled. Parchment paper provides an extra layer of protection and helps create clean edges.
Step 2: Combine Dry Ingredients
In a large mixing bowl, whisk together the flour, cocoa powder, sugar, baking powder, baking soda, and salt. Whisking ensures that all the dry ingredients are evenly distributed, which is essential for a consistent cake texture. The cocoa powder adds the rich chocolate flavor, while the baking powder and baking soda provide the necessary leavening for a light and airy cake.
Step 3: Incorporate Wet Ingredients
Add the buttermilk, vegetable oil, eggs, and vanilla extract to the bowl with the dry ingredients. Mix until well combined. Buttermilk adds moisture and a slight tanginess to the cake, enhancing the chocolate flavor. Vegetable oil keeps the cake moist, and the eggs provide structure and richness. Vanilla extract enhances the overall flavor profile.
Step 4: Add Hot Liquid
Slowly stir in the hot water or coffee until fully incorporated. The batter will be thin. Hot water or coffee intensifies the chocolate flavor and helps dissolve the cocoa powder, resulting in a smoother batter. Don’t be alarmed by the thin consistency; it’s normal for this recipe.
Step 5: Bake the Cake
Pour the batter into the prepared pan and bake for 30-35 minutes, or until a toothpick inserted in the center comes out clean. Baking time may vary depending on your oven, so check for doneness after 30 minutes. A clean toothpick indicates that the cake is fully baked.
Step 6: Cool the Cake
Let the cake cool in the pan for 10 minutes, then transfer it to a wire rack to cool completely. Cooling the cake in the pan prevents it from sticking and allows it to set properly. Transferring it to a wire rack ensures even cooling and prevents condensation from forming on the bottom.
Step 7: Make the Ganache
Heat the heavy cream in a saucepan over medium heat until it starts to simmer, but do not let it boil. Remove from heat and pour over the chopped dark chocolate. Let it sit for 2-3 minutes, then stir until smooth. Heating the cream activates its ability to melt the chocolate, creating a smooth and glossy ganache.
Step 8: Finish the Ganache
Add the butter and stir until fully incorporated. Let the ganache cool slightly until it thickens but remains pourable. Butter adds richness and shine to the ganache, making it even more decadent. Allowing the ganache to cool slightly ensures that it’s the perfect consistency for pouring over the cake without being too runny.
Step 9: Create the Chocolate Nest
Melt the dark chocolate in a microwave-safe bowl using 30-second intervals, stirring between each, until smooth. Chocolate can burn easily in the microwave, so it’s essential to melt it in short intervals and stir frequently.
Step 10: Pipe the Nest
Transfer the melted chocolate to a piping bag or a small ziplock bag with the corner snipped off. Lay a sheet of parchment paper on a baking tray, then pipe the chocolate in crisscrossing strands to form a circular nest shape. Using a piping bag or ziplock bag allows for precise control when creating the nest shape. The parchment paper prevents the chocolate from sticking to the tray.
Step 11: Chill the Nest
Place the tray in the refrigerator for 15-20 minutes, or until the chocolate nest is firm. Chilling the nest ensures that it sets properly and becomes sturdy enough to handle without breaking.
Step 12: Assemble the Cake
Place the cooled cake on a serving platter. Pour the chocolate ganache over the cake, letting it drip down the sides. The ganache should be pourable but not too runny.
Step 13: Add the Chocolate Nest
Carefully peel the chocolate nest from the parchment paper and place it on top of the cake. Be gentle when removing the nest from the parchment paper to avoid breaking it.
Step 14: Decorate and Serve
Fill the nest with mini chocolate eggs before serving. The mini chocolate eggs add a festive touch and complete the Easter-themed look.
Why You Will Love This Recipe:
This Chocolate Easter Egg Nest Cake is more than just a dessert; it’s an experience. You’ll love it because:
- Rich Chocolate Flavor: The combination of cocoa powder in the cake and dark chocolate in the ganache and nest creates an intense and satisfying chocolate experience. The use of hot coffee enhances the chocolate depth.
- Moist and Tender Cake: The buttermilk and vegetable oil in the cake batter ensure a moist and tender crumb that melts in your mouth.
- Decadent Ganache: The dark chocolate ganache is smooth, glossy, and incredibly rich, providing a luxurious coating for the cake.
- Festive Presentation: The chocolate nest filled with colorful mini chocolate eggs adds a whimsical and festive touch that’s perfect for Easter celebrations.
- Relatively Easy to Make: Despite its impressive appearance, this cake is surprisingly easy to make. The steps are straightforward, and the recipe is forgiving.
- Customizable: You can customize the recipe to your liking by using different types of chocolate, adding nuts or sprinkles, or experimenting with different fillings for the nest.
- Impressive Showstopper: This cake is guaranteed to impress your guests with its beautiful presentation and delicious flavor.
- Perfect for Sharing: It’s a great cake to share with family and friends during Easter gatherings, creating lasting memories.
- Great for All Ages: The combination of chocolate cake and colorful eggs makes it appealing to both kids and adults.
COOKING Rating:
Medium
Serving Suggestions:
- Serve the cake chilled or at room temperature.
- Accompany with a scoop of vanilla ice cream or a dollop of whipped cream.
- Pair with a glass of cold milk or a cup of hot coffee.
- Garnish with fresh berries or a sprinkle of cocoa powder for an extra touch.
- Cut into slices and serve as part of an Easter dessert buffet.
Tips:
- Let the cake cool completely before adding the ganache to prevent it from melting too quickly.
- For a more intense chocolate flavor, use coffee instead of hot water in the cake batter.
- If the ganache thickens too much before pouring, gently reheat it in short intervals until it reaches a smooth consistency.
- When making the chocolate nest, work quickly to pipe the chocolate before it starts to set.
- Use high-quality dark chocolate for the best flavor and texture.
- Don’t overbake the cake, as this can result in a dry cake.
- Store the cake in an airtight container at room temperature for up to two days or refrigerate for longer freshness.
- You can make the chocolate nest a day in advance and store it in an airtight container at room temperature.
- Feel free to use a different type of chocolate for the nest and ganache, such as milk chocolate or white chocolate.
- Add a layer of raspberry jam between the cake and ganache for a burst of fruity flavor.
Prep Time:
30 minutes
Cook Time:
30-35 minutes
Total Time:
1 hour 30 minutes (including cooling and chilling time)
Nutritional Information:
(Approximate values per serving, will vary based on specific ingredients used and serving size)
- Calories: 550-650
- Protein: 8-10g
- Sodium: 300-400mg
Conclusion
The Chocolate Easter Egg Nest Cake is a delightful and visually stunning dessert that’s perfect for celebrating Easter. With its rich chocolate flavor, moist texture, and festive presentation, this cake is sure to be a hit with everyone. While it requires a few steps, the process is straightforward and the result is well worth the effort. Whether you’re hosting an Easter brunch or simply want to treat your family to something special, this cake is a fantastic choice. It combines the best of both worlds – the comforting familiarity of a chocolate cake with the playful charm of an Easter-themed dessert. So, gather your ingredients, follow the steps, and get ready to create a memorable and delicious Chocolate Easter Egg Nest Cake!
Questions and Answers:
Q1: Can I use a different size cake pan?
A: While this recipe is designed for a 9-inch round cake pan, you can adapt it for other sizes. If using a smaller pan, be sure to reduce the baking time to avoid overbaking. If using a larger pan, the cake may be thinner and require less baking time. Keep a close eye on the cake and test for doneness with a toothpick. You may also need to adjust the amount of ganache accordingly.
Q2: Can I make the cake ahead of time?
A: Absolutely! The cake can be made a day or two in advance and stored in an airtight container at room temperature or in the refrigerator. In fact, making it ahead of time can actually improve the flavor and texture of the cake. Just be sure to let it cool completely before storing. The chocolate nest can also be made in advance and stored at room temperature.
Q3: Can I use store-bought ganache instead of making my own?
A: While homemade ganache is always preferable for its superior flavor and texture, you can certainly use store-bought ganache if you’re short on time. Just make sure to choose a high-quality ganache that you enjoy. You may need to adjust the consistency by adding a bit of heavy cream or butter to achieve the desired pourable texture.
Q4: What if I don’t have buttermilk?
A: If you don’t have buttermilk on hand, you can easily make a substitute by adding 1 tablespoon of lemon juice or white vinegar to 1 cup of regular milk. Let it sit for 5-10 minutes, and it will curdle slightly, creating a suitable buttermilk substitute.
Q5: Can I add nuts to the cake or ganache?
A: Yes, you can definitely add nuts to the cake or ganache for extra flavor and texture. Chopped walnuts, pecans, or almonds would all be great additions. You can add them directly to the cake batter before baking or sprinkle them on top of the ganache after pouring. Just be sure to chop the nuts finely so they don’t weigh down the cake or make the ganache too chunky.